Z.u.L. > Documentation > Context Help

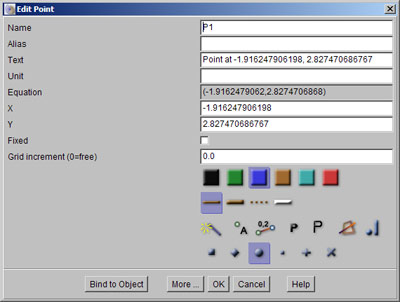
Open the properties dialog of an object with a right click, or with the edit tool. Most settings are common to all objects.
- name
- description
- unit
- color
- thickness
- hiding state
- show name
- show value
- large of fat font
- background state
- transparent state
- breakpoint
Names can contain almost all characters. If they contain "~", the display will only show the part before the tilde, allowing the same displayed name for more than one object. The name must be unique. DEscriptions are generated automatically, but can be changed. If they are changed, the user can revert to the automatic description by entering an empty line.
Objects can use another name (an alias) for display than the internal name. This is useful, if the display contains LaTeX code enclosed in $...$. The alias may contain expressions in %...% which are evaluated at run time. Strings of the form %=s% will return the current name of object "s", and strings of the form %~s% will return the equation of s.
Some objects have a size and units. Changing the size works only for fixed objects. Units can be any text after the size. For angles, use the degree symbol.
The thickness works differently for different objects. The white thickness makes the object invisible, but not its label. Objects can be hidden or completely hidden. In the latter case, they can only be accessed through the construction description.
Objects can have one of the six predefined colors from the C.a.R. color scheme, or a user defined color. To set a user defined color as default color, there is a menu entry. Alternatively, add the icon for user defined colors to the icon bar.
Some objects (points, areas and circles) may fill with the background color. In this case, these objects are drawn above other objects. Points get this state by default. Note, that objects with background fill must be in normal thickness. For points in 3D constructions, which can be covered by other objects, this state should be switched off.
Name and value display can be combined as in "s=2". If the name ends with an underscore as in "P_", the "_" will be deleted and there will be no "=".
 Some objects have a filled state, like circles and angles. Moreover,
transparency can be switched on and off for these objects. Normally,
only filled objects are in the background, but other objects can be
set into the background too. Note, that using
conditional formatting a specific order of the objects in the
background can be achieved.
 Breakpoints are important for replay and for the animation of
breakpoints. Breakpoints can either be set in the replay dialog, or in
the properties dialog of the object. For hiding breakpoints press the shift key.
Some objects can display their value as fractions. This will also apply in text objects, if the object is referred with %name%.
Distances and angles can be display with their values in the Rational Geometry. See the section in the link list about this way to compute trigonometric values for more information.
Also, have a look at the buttons on the lower side of the properties dialog. E.g., points have a special button to choose an object to bind to (bound points), fixed angles and fixed circles have a special button to set the size. The dialog will close and the user has to select the objects or sizes from the construction.
Some objects have a checkbox to set automatic intersections. This means that the user can intersect other objects with this object, and can bind points on it with the point tool, or any other tool expecting a point. For polygons this it not a good idea, since point on polygons should not be used for triangle constructions. Instead, the sides of the polygons should be constructed as line segments.
Related topics: Edit Objects, Conditional Formatting, Set colors, Hiding Objects, The Mouse, Transparency, Points, Fixed angles, Walk through constructions, Animate breakpoints, Syntax for Expressions, LaTeX Code, Rational Geometry
Next topic: LaTeX Code