C.a.R. > Documentation > Macros
Macros are shortcuts for construction steps, just like subroutines of programming languages. To generate a macro, the user constructs a sample, and the macro generator learns from that sample what to do. Macros have parameters, which determine the objects to start from. They also have targets, which determine the things to construct.
As an example, consider constructing the circle of circumference for a triangle. The circle would be the target, and the three corners would be the parameters.
Macros can be defined in descriptive constructions too. The syntax is similar to a subroutine call in a programming language. For more details, see the documentation of descriptive constructions.
Macros can be saved to macro files and can be included in construction files. When constructions are loaded all macros in the file become available to the user.
To run a macro, use the macro tool, the popup menu or the macro icon bar.
If the macro icon bar is switched on, macro can get icons in the macro bar for fast user access. To mark a macro for the icon bar, finish its name with a short tag in brackets. You may also provide an icon for the macro, or use one of the icons contained in the program archive. Icons should be 32x32 PNG files with transparency. If you antialias the icon, do so for a light gray background. Place the icon in an "icons" subfolder of the starting directory. If there is no icon, the tag will be used as text. More information is here.
When C.a.R. starts, it looks for a file named ".default.mcr" in the current directory. If it can find this file, the program will load all macros in the file. If not, it will use the default macros stored in the program archive. The macros in that file get default macros and are protected. In applets, you need to include necessary macros in the construction file. Also in constructions using a restricted tool bar, the default macros are not visible, and any macros needed must be included and saved with the construction.
Protected Macros are not deleted, when a new constructions loads. Moreover, they are not saved with constructions. If you wish to save a default macro with the construction, save it into a macro file and load it from that file to unprotect it.
To make your own language version of this file, save your macros in a file named ".la_default.mcr", where "la" is the shortcut of your language. You can find that shortcut in the version information in the help menu. You may like to send me the file for inclusion in the program archive.
![]() To
define macros, use the macro definition tool. The parameters must be chosen with
the mouse.
To
define macros, use the macro definition tool. The parameters must be chosen with
the mouse.
![]() The
tool looks like this in this state. Select the parameters.
The
tool looks like this in this state. Select the parameters.
![]() Then
press the tool once more and it will look like this. You will see only those
objects, which are constructible from the parameters. Select all targets.
Then
press the tool once more and it will look like this. You will see only those
objects, which are constructible from the parameters. Select all targets.
If you do not select targets, all objects depending on the parameters (the object that are visible at this step) will be constructed by the macro. Targets will get the default color and styles. All other objects get the same style as in the macro definition, with the exception that black objects get the default color. Especially, all hidden objects will be constructed hidden. However, there is an option in the macro creation dialog to hide all objects, which are no targets, automatically, even if they were visible in the construction. It is possible to hide intermediate steps completely.
If the macro is used in the descriptive mode, the user can assign names only to target objects. This is another reason to define at least one target object.
Another press to the macro tool lets you define the macro and opens the definition dialog. You can enter the name, a comment, and you can edit the prompts for each parameter.
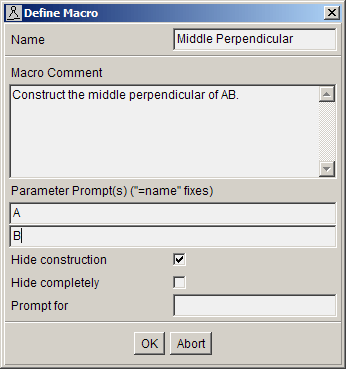
Moreover, you can specify, if the macro should hide any objects but the targets. These objects can even be completely hidden.
A special feature allows to hide parameters. If a hidden point is chosen as a macro parameter during the generation of the macro, and if that point is associated to a point generated during the parameter selection at run time, this new point will be hidden after the macro has been run. This feature makes it possible to use points as hint parameters. An example would be a macro, which generates an equilateral triangle on a segment. The hint would be a third click indicating either side of the segment. In this case, an expression must be used for one of the 60 degree angles involving the third point, something like "60*sign(180-a(P,A,B))".
It is possible to fix a parameter to an object A by using "=A" for the parameter prompt. The parameter will not be prompted, but instead an object "A" will be used, if there is one, and if it has the correct type. Parameters can be fixed at the run time of the macro too.
Finally, it is possible to ask the user for a value for either a fixed circle, a fixed angle or an expression, while the macro is running. To do this, enter the name of the circle or angle into the box in the last line. The user will be prompted with a dialog and may enter any arithmetic expression.
To prompt for an expression allows very flexible constructions. E.g., extending a segment AB by a user chosen factor can be done this way. Even negative factors can be handled, for the coordinates of the generated point may both be expressions.
By default, macros hide targets that were already present to avoid duplicates. This can be switched off in the macro definition.
Macros can be organized in folders. This helps to avoid long lists of macros in the program. To put a macro in a folder, put the folder name in front of the macro name separated by "/", like in "folder/macro". This has nothing to do with file folders, of course.
The macro folder will appear in the popup menu as a submenu, and in the macro list as a folder name in blue, like "/folder". Double click on the folder name to switch to the macros in that folder. Click on ".." to revert to the parent folder.
Note that you can delete several macros at once. You can even delete a complete folder of macros, if you select it.
Macros can be loaded and saved with the construction or separately. The macro file format is identical to the normal file format, but contains only macros and no construction. If the option to save macros with files is enabled, all macros will be saved along with the construction. When these files are loaded, the user is prompted before existing macros are overwritten.
For the HTML export, you need to include macros to the construction. Default macros are explained above. Also, for construction that use a restricted icon bar, you need to save all necessary macros with the construction.
![]() This
is started with this tool or with a right click in the construction. The macro
can be selected from a list. If the Ctrl-key is pressed while pressing this
tool, the recently used macro will be called.
This
is started with this tool or with a right click in the construction. The macro
can be selected from a list. If the Ctrl-key is pressed while pressing this
tool, the recently used macro will be called.
Then the program will prompt for each parameter and display the expected object type in the status line.
If you see "Space selects ...", you can choose this object simply by pressing the space bar. This is useful, if the macro is used several times.
You can also fix the selection of macro parameters by pressing the shift-key during the selection. This will create a copy of the macro, which is fixed in these parameters. You cannot fix all parameters, of course.
Finally, the macro will be executed. If the macro needs a value for a fixed circle or an angle, it will prompt with a dialog box. The user can enter any arithmetic expression for this value.
Macros can be iterated, if they depend only on one point and produce at least one target point. In this case, the macro will repeat itself several times, setting the recently produced target point as parameter point in each step. The number of iterations can be set by the user. Instead of a point, any other parameter type can be used, if it produces a compatible target type. If a macro needs more parameters than just one point, all other parameters need to be fixed.
A short example could be the study of an iteration from point to point. Make sure, the iteration depends only on the previous point, and fix all other necessary parameters with "=...prompt...". Another example is a set of functions depending on each other recursively.
If you want to generate a set of functions depending on 1,2,3,..., create an expression depending on a previous expression plus 1 in the macro.
It is easiest use points as parameters. But other types are possible too.
Lines, rays, segments, and circles generate secondary parameters, namely the two end points, or the midpoint respectively. This simplifies macro usage. However, the user must take care to use these parameters in the same configuration. Two concentric circles must be concentric. If the segments AB and BC are macro parameters, then the user must choose segments EF and FG. In this case, it is advisable to use point parameter instead.
Lines and rays are of two types: with two defining points, and with one defining point (e.g. parallel lines). In the macro, lines, rays, and segments are stored as pointless lines, if their defining points are not used in the target construction, of if they have only one defining point. The user can then choose any line as a parameter. If the one of the two defining points is used, the user will have to choose a line, ray or segment of the same type.
As described in the section about construction objects, it can be useful to make an object depend on itself. E.g., a point can be bound inside a circle this way by fixing its coordinates with an if-expression. Those points will be created without problems as macro targets. However, a point selected as macro parameter will normally not be changed in any way when the macro runs.
An exception are self referring parameter points, which transfer the reference to the selected parameter points at run time. Since this may be confusing, any parameter point to be used in such a way must be selected with the shift key when it is selected at definition time. Otherwise, it will use its special properties and become an ordinary point. At run time, there is no need to press the shift key.
When using expressions in macros, the parameter objects, which might be used in the expression, will be correctly replaced. This can lead to very tricky constructions.
C.a.R. > Documentation > Macros