C.a.R. > Documentation > User Interface
The main window
Configuring the icon bar
The permanent object list
Restricted school mode
The
mouse
The keyboard
Loading and saving files
Background pictures
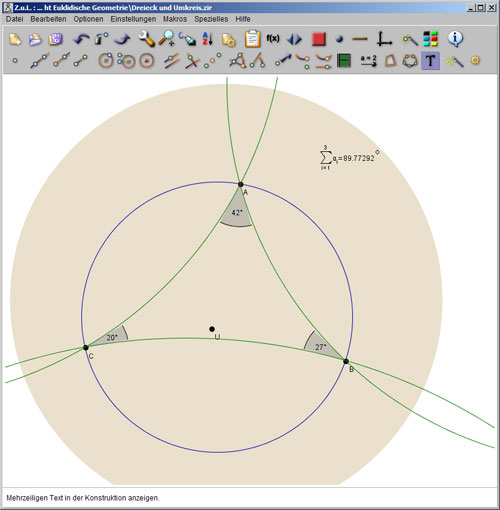
Above you see the main window of C.a.R. in default configuration downsized to half the original size. The big area displays the construction. The displayed view of the construction can be moved with the arrow keys, and enlarged with +/-. Moreover, you can use the zoom tool to change the view. Or you can simply use the mouse wheel. Dragging some empty spot with the right mouse will move the view around.
Above the construction you find the icon bar. The icons display tool tips, if the mouse remains above them for more than two seconds. The lower bar contains the construction tools. The upper bar contains default settings, and settings for the display. The icon bar may also be concentrated into a single line of icons. Moreover, the icon bar can be set to appear under the construction.
The icon bar can contain a line for macro icons.
Below the construction, there is a status line, which displays important text information. In the non-visual mode, this line is replaced by an input line.
The window menu contains all options available in the icon bar, and many further commands not available as icons. In the menu, you find the keyboard shortcuts for many commands.
To configure the icon bar, start the dialog with the corresponding menu entry. You can select and deselect any icon. Moreover, you can choose to display the icons in a single row. Then the icon bar will only show the most urgent tools.
Note that deselected icons can still be used by the keyboard and the menu, unless the program is in school mode. But in applets, only the visible icons can be used.
There is a restricted icon bar. The configuration of this bar is saved and loaded with constructions. You can use it to restrict icons for users of your constructions. After you have enabled the restricted icon bar, edit this icon bar. Switch back to your normal icon bar with the same menu switch.
It is possible to have a list of objects on the left side of the construction display. To toggle the list on or off, use the menu item or F11. In the list, objects can be selected with the mouse. For multiple selections, use the CTRL- or the SHIFT-key as usual. A popup menu appears with a right mouse button click. You can choose to edit the object or the objects, edit the conditional properties, delete, hide, or completely hide objects. Double clicking an object will open its property dialog.
The object list can be reduced to certain types of objects. From the drop down list, choose the types you wish. Moreover, the list can be sorted according to either the internal order, or to the order the objects where constructed. Choose the internal order to see the dependencies of the objects.
In this mode, the user can only use those items, which are present in the icon bar. This also applies to switching between visual and non-visual mode, un-hiding hidden objects and macros. Moreover, many advanced settings are disabled and the menu is simplified.
This mode is set by a menu switch and works for the next program start. To prevent users to change the mode, use either of the following procedures.
The left mouse button is used to create construction objects according to the currently active tool. E.g., when the program starts, the point tool is selected. In the status line, the user is told that a point can be set. C.a.R. will indicate the selectable objects when the mouse is moved over the construction. Moreover, the mouse pointer changes accordingly.
Many tools expect that the user chooses more than one object. E.g., one can generate a line by choosing two points. In this case, the first point is highlighted in red, while the tools is waiting for the second point. In some cases, the user has to press the shift-button to indicate that more objects will follow.
There is a preview of the result of a construction, when the last mouse click is expected to finish the construction. This preview feature can be turned off in the advanced settings dialog. Moreover, you will see previews of intersections and of points on objects.
If a selection is not uniquely determined, the program will display a list of possible objects. One can take an object from this list by double clicking on it, or by selecting it and pressing of the button, or with the keyboard. Points will be black, lines red, angles (and other objects) green and circles blue. Types can be easier recognized, if the long name convention is active. The short names of each object type will start with a different letter only. The selection dialog can be disabled. The program will then select the closest of the objects automatically.
An important feature is, that a point will be automatically created, if the program expects the user to select a point, and the user clicks on free space. Moreover, intersections will be created, if the user clicks on an intersection, and points will be generated on objects. It is possible to enable options to ask the user before creating intersections and points on objects. If the preview feature is active, then the automatic point selection and creation will not display any selection dialog. However, the user can enforce a selection dialog with the control-key.
If the shift-key is pressed, when a circle, a segment or an angle is constructed, the program will assume that object is to be fixed and will display the object dialog. Then the user can enter a value to fix the object, or simply close the dialog and fix the current value. It is probably better to use the tools for fixed circles and angles instead.
The right mouse button drags objects and labels of objects (alternatively to the move tool), and it opens the settings dialog for objects. If a label is right-clicked but not moved, it jumps to its default position. The right mouse button drags the view, if the dragging starts on an empty space.
A click with the right mouse button on an empty spot opens a menu for macro selection. In the special settings, this can be configured to require a double click.
With the ctrl-key plus the shift-key and the right mouse button, an object can be hidden without using the hide tool. Circles and lines will first become partial, then hidden. The ctrl-key alone opens the dialog to set conditional properties.
The mouse wheel zooms in and out.
All tools have shortcuts. You can find the shortcuts in the menu, or in the tooltips that open, when the mouse remains over a tool icon for some time.
C.a.R. replaces the system file dialog by default with an own file dialog. This file dialog is more convenient for finding old directories and files. The operation of this dialog should need no explanation. With an option in the settings dialog, it is possible to switch to the normal file dialog.
The various file types include constructions, assignments and macros. All these files use XML and look very much alike. Note, that you can choose to include your macros in the constructions files or not.
C.a.R. can display a picture behind the current construction. This picture can be a construction state or a picture loaded from a file. To fix or release a construction state, use the photo button.
![]() A
picture from a file can be tiled, centered or stretched to fit the construction
window. There is an option to resize the window to the size of the loaded
picture.
A
picture from a file can be tiled, centered or stretched to fit the construction
window. There is an option to resize the window to the size of the loaded
picture.
It is also possible to attach a picture to a point and even scale and distort it. See the documentation about the tools and objects for more information.
C.a.R. > Documentation > User Interface